
Add an Outlet
On an Edge Server, needs Edge Server 5.4.0 or later and mobile app 5.4.0 or later.
The mobile app adds an Outlet, the Growbud Power Meter Outlet. You give the serial from the label. You tap the Outlet in the list of nearby Outlets. The app sets up the Outlet over Bluetooth. Then the Outlet joins the LoRaWAN network.
After that, you switch the Outlet from the app or through the Write API.
Before you start
| You need | Why |
|---|---|
| The Outlet, plugged in | The Outlet sends Bluetooth only when it has power. |
| The mobile app, with Bluetooth on | The app reads the Outlet and writes its network settings over Bluetooth. |
| The serial on the Outlet label | The serial is 8 characters after SN. An Outlet serial starts with C2, for example C2000000. |
| An indoor gateway near the Outlet | The Outlet joins through the indoor gateway. On an Edge Server, the indoor gateway must send to the Edge Server. See Flash the indoor gateway SD card. |
| An administrator account, on an Edge Server | Only an organization administrator can add or remove an Outlet on an Edge Server. |
Where the Outlet goes depends on how the mobile app is signed in:
| The mobile app is signed in to | The Outlet goes to |
|---|---|
| Growbud Cloud | Your Growbud Cloud account. A linked Edge Server gets the Outlet at its next sync. |
| An Edge Server only (see Link your phone to an Edge Server) | That Edge Server. The Edge Server registers the Outlet on its own LoRaWAN network. |
If the Edge Server is linked to Growbud Cloud, add the Outlet in Growbud Cloud. A linked Edge Server refuses to add an Outlet itself.
1. Open Add device
- In the mobile app, open the menu.
- Tap Add device.
- Under Scan the label or type the DevEUI, tap Outlet.
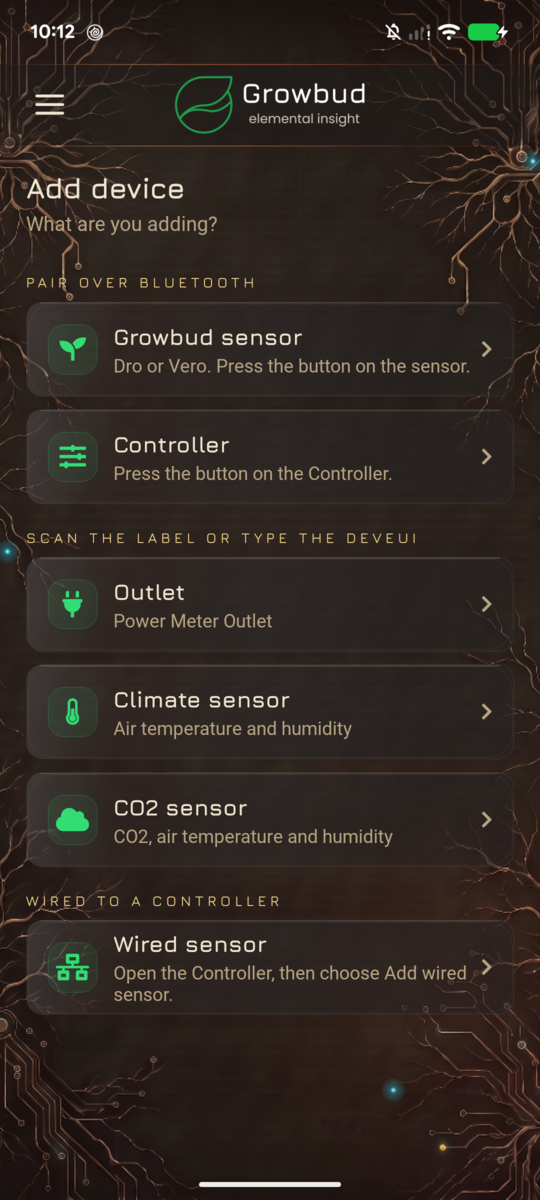
You can also open the same screen in these places:
- In Settings, tap Add sensor or outlet.
- On the Controller home screen, tap Add outlet.
- On the Outlets list, tap the add button.
2. Give the serial
- Tap Scan label QR.
- Point the camera at the QR code on the Outlet label.
- Optional: type a name in Name (optional), for example
Veg tent fan.
The app reads the serial from the label. If the camera is not available, type the serial in Serial. Letters can be upper or lower case.
You do not type the DevEUI for an Outlet. The DevEUI is the 16-character LoRaWAN ID of the Outlet. The app reads it from the Outlet over Bluetooth.
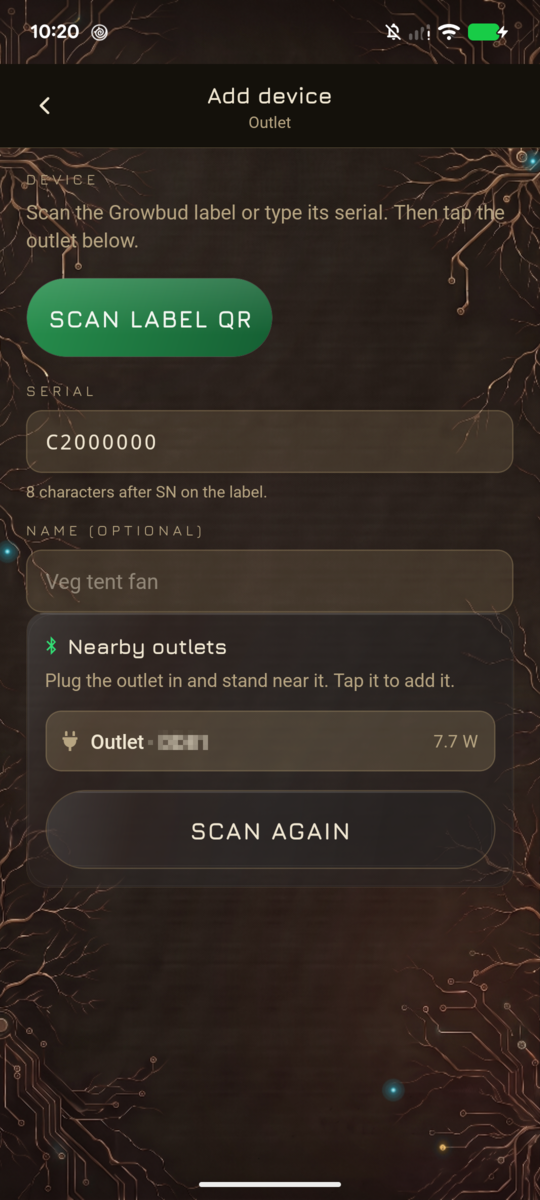
If you scan a label that is not for an Outlet, the app shows "This label is not for a LoRaWAN outlet or climate sensor." Scan the label on the Outlet.
If the serial is not correct, the app shows why when you tap an Outlet:
| Message | What to do |
|---|---|
| Serial must be 8 hex characters, as printed on the label. | Type the 8 characters after SN on the label. |
| A outlet serial starts with C2. | You have the serial of a different device. Use the Outlet label. |
3. Tap the Outlet in Nearby outlets
The Nearby outlets card scans when the screen opens. Each Outlet shows as Outlet · and the last 4 characters of its Bluetooth address, with the power it measures now.
- Stand near the Outlet.
- Tap the Outlet in the list.
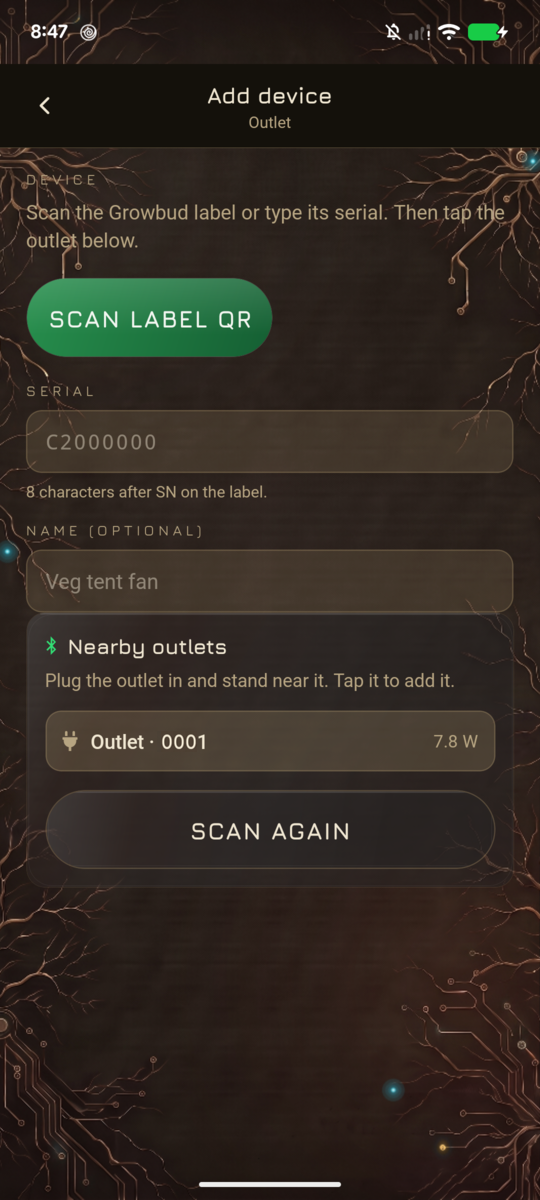
If the list stays empty, the card shows "No outlets found. Unplug the outlet, plug it back in, and scan again." Do these steps, then tap Scan again.
What the app does
The app shows "Setting up the outlet…". In one Bluetooth session, the app:
- Reads the DevEUI, the JoinEUI and the AppKey of the Outlet. The JoinEUI and the AppKey are the LoRaWAN keys that let the Outlet join a network.
- Writes the Growbud network settings.
- Restarts the Outlet, so that it joins the network with the new settings.
The Growbud network settings are:
| Setting | Value |
|---|---|
| Region | US915 |
| Channels | 0 to 7 (sub-band 1) |
| LoRaWAN class | C |
| Uplinks | Unconfirmed, one transmission, ADR on (the network sets the data rate) |
| Electrical report | Every 30 s |
| Switch report | Every 60 s |
| Energy report | Every 10 minutes |
The app reads back the report intervals after it writes them. If the Outlet did not keep a setting, setup stops. The app shows "<setting>: the outlet did not keep the setting". See Bluetooth errors.
The app does not change the AppKey. It sets up only an Outlet that still has the factory JoinEUI and AppKey. If the Outlet has different keys, the app shows "This outlet uses custom network keys. Contact Growbud support to add it."
The Outlet password
The app logs in to the Outlet with the factory Bluetooth password. If the Outlet refuses it, the app shows "This outlet is not using the factory password. Enter its password to continue."
- Type the password in Outlet password. It has 8 characters.
- Tap Try again.
If the password is not correct, the app shows "The outlet did not accept the password." Type the password again.
The app uses the password for this session only. Growbud does not save it.
4. Wait for the join
The app then shows a status line until the Outlet is added.
| Signed in to | Status line | What happens |
|---|---|---|
| Growbud Cloud | Waiting for the outlet to join the network… | The app claims the Outlet in Growbud Cloud. It tries again until the Outlet joins. |
| An Edge Server only | Adding the outlet to the Edge Server… | The Edge Server registers the Outlet before the Outlet joins. There is no wait. |
Growbud Cloud knows the Outlet only after its first uplink. Until then, the app tries the claim again every 10 s, for 3 minutes maximum.
When the Outlet is added, the app opens the Outlet screen.
If the Outlet does not join in 3 minutes, the app shows "The outlet did not join the network. Move it closer to a Growbud gateway and try again." Check that the indoor gateway sends to Growbud Cloud. Then tap the Outlet again.
If the Outlet is already on the Edge Server, the app opens it. It does not add it a second time.
Bluetooth errors
| Message | What to do |
|---|---|
| Turn on Bluetooth to reach the outlet. | Turn on Bluetooth on the phone. |
| Allow Bluetooth for Growbud in Settings. | Give the mobile app Bluetooth permission in the phone settings. |
| Could not connect. Move closer to the outlet and try again. | Move closer. Tap the Outlet again. |
| The outlet did not answer in time. | Tap the Outlet again. |
| The outlet closed the connection. | Tap the Outlet again. |
| The outlet refused that setting. | Contact Growbud support. |
| <setting>: the outlet did not keep the setting | Tap the Outlet again. If it fails again, contact Growbud support. |
5. Switch the Outlet
On an Edge Server
The Outlet screen shows the switch state, Online or Offline, the last report, the power and the serial. It reads the Edge Server again every 5 s while it is open.
- Tap Turn on or Turn off.
The state text shows "Turning on…" or "Turning off…" until the command ends. The command ends when the Outlet reports the new state, or when the command times out. You cannot tap the buttons until the command ends. If the Outlet has not sent a current switch report, the state text is "Waiting for the outlet to report".
On Growbud Cloud
- Tap the round switch under Via network.
The dial then shows the progress:
- While it waits, the dial shows "Turning on…" or "Turning off…" with a progress ring.
- When the Outlet reports the new state, the dial shows a check mark.
- After 10 s, you can tap Cancel to stop the wait. The command still goes to the Outlet.
- If the Outlet does not confirm in time, the dial shows "Not confirmed". The app shows "The outlet didn't confirm. It may be out of range or unplugged." Tap Retry to send the command again.
If the Outlet has not reported recently, you cannot tap the switch. The app shows "Outlet is offline. Wait for it to check in, or take local control below." Local control switches the Outlet over Bluetooth when you are near it.
Through the Write API
On an Edge Server, your system can switch the Outlet.
- Get the DevEUI from
GET /sensing/v1/outlets. Find the Outlet by itsserial. - Send the switch command:
curl -sk -X POST -H "Authorization: Bearer $TOKEN" -H 'Content-Type: application/json' \
  -d '{"on": true}' "https://<your Edge Server address>:8443/control/v1/outlets/<devEui>/switch?wait=30"
The token needs the control scope. See Authentication and Outlets for retry, wait and the command status values.
6. Read the known state
An Outlet reports its switch state on its own. A command does not change the state that the Edge Server shows. Only a report from the Outlet changes it. Read the state with GET /sensing/v1/outlets/{devEui}, at outlet.switch:
| Field | Meaning |
|---|---|
state | on, off or unknown. It is unknown when there is no switch report, or when the last report is stale. |
confirmed | true only when the state is known and no command is pending. |
reportedAt | The time of the last switch report, or null. |
stale | true when there is no report, or the last report is too old. |
pending | The open switch command, or null. |
lastChange | The last change of the switch, or null. |
desired | The retry request (on, status and more) from a switch with "retry": true, or null. It stays after the retry ends. See Outlets. |
When a switch report is stale:
| Report interval | The report is stale after |
|---|---|
| Known | 3 report intervals, and never sooner than 5 minutes |
| 60 s (the Growbud switch report) | 5 minutes |
| Unknown | 30 minutes |
Trust state only when confirmed is true. If stale is true, the Outlet is out of range, or has no power, or the indoor gateway does not send to the Edge Server.
Remove an Outlet
On an Edge Server
An administrator removes an Outlet:
- Open the Outlet.
- Tap Remove outlet.
- Tap Remove to confirm.
The Edge Server stops controlling the Outlet.
If the Edge Server is linked to Growbud Cloud, remove the Outlet in Growbud Cloud. The Edge Server shows "This outlet belongs to Growbud Cloud. Remove it there."
On Growbud Cloud
- Open the Outlet.
- Tap Details and diagnostics.
- Tap Remove from account.
- Tap Remove to confirm.
The Outlet leaves your account.
Next
- Outlets: switch an Outlet and hold its state through the Write API.
- Link your phone to an Edge Server: sign in the mobile app to an Edge Server.
- Errors and limits: error codes and rate limits.